Sunday, April 22, 2012

Paint-a-Pot Party

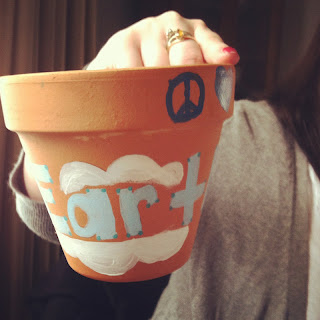
In honor of Earth day, I hosted a Pot Painting Party! It's a great idea for a different type of get together for you and your friends. We decided Sunday Brunch style would be best, and had trays of fruit, cheese, cinnamon buns, muffins, and mimosas. Lots and Lots of mimosas.

If you are thinking this is something you would like to do with your friends, all you really need are paint brushes, terra-cotta pots, paint...and that's pretty much it. Our rule was you can paint as many pots as you want, but you had to leave one with us for our garden.


baby pot


Sam loves earth day.


the pots everyone left for us


It's five o clock somewhere.  The mimosas started flowing at noon.


cheetah print


Happy Earth day!

--Emily Jo

Friday, April 20, 2012

Frosted Solar Light

To stay on the Earth day kick this week that Heather has started with her previous posts, I decided to continue by making a DIY Solar Light tonight.


I saw this glass jar solar light on UrbanOutfitters.com for about $35. It was love at first sight. I was about to hit the "add it to my shopping cart" button, but saw that Heather had a similar post on her pinterest craft page with a DIY option. Yes please.

Supplies:

Solar Light
Glass Jar with top
Frosted Glass Spray
Hot glue


The longest part of this project was finding all the supplies. I went with a solar light lawn stake I found at Home Depot for $1.99.  Make sure the solar light you chose is detachable from the rest of the unit, all you need is the sensor and lightbulb part for this to work.


I decided to make this as a birthday gift for someone, so I took a sticker of their first initial and placed it on the glass before frosting. This worked great, so next time I'm going to do a whole word.


Spray your glass frosting spray about 10 inches from your jar. I chose a blue tinted spray. Once dry, peel off any stickers/letters you may have put on.


*Important- DO NOT spray the lid to your jar. It has to stay clear so the sensor can get sunlight during the day so your jar will glow all night.


Detach your solar light from the rest of your unit.


Hot glue your solar light to the top of your glass jar, sensor side up.


Alright...start charging your light.  I stuck mine under a lamp for about 5 minutes. If you leave yours in a well lit room during the day, it should glow for up to 12 hours at night. 


If you decide to do any type of stickers like I did, the cool part is that it gives off a shadow in the shape of that sticker in the dark.


It was so difficult to get a good photo of this project. But it really does give off a great amount of light. And it's solar powered! A perfect Earth Day project.

--Emily Jo


Thursday, April 19, 2012

Vegan Green Mac & Cheese

I will apologize in advance for lack of photos here, but I wasn't planning on blogging about this recipe until I tried it and just had to share! I went to my kitchen with the idea that I'd make some sort of spinach-y pasta and this was born. If you have a blender and can boil water, you can make this, I promise. 

Ingredients: Serves 2-4
4 oz of fresh spinach - you could also use kale or chard 
Handful of dry, unsalted cashews - I think any nut would work here
1 clove of garlic - for those Italians out there like me, suppress your urge to add more, 1 clove was perfect
Approximately 4 tbs of olive oil
Salt and pepper to taste
Lemon zest - optional, I just had a lemon on hand. I probably used 1/2 tsp
Water to blend


Put some water in a pot to boil for your pasta, and then throw all the other ingredients into the blender and have at it.  We have a very basic blender, so this took a bit of poking the spinach down to the blades and adding water to thin it a bit. Look at how rich and creamy the result was!


As you can see, I scrambled to write this all down while it was still fresh in my brain. 


Once the pasta is cooked and drained, return it to the pot and pour in some of the spinach sauce to heat it.  No need to turn the burner back on, the heat from the pasta and pot are enough. Seriously though, this had the same consistency and flavor of mac and cheese, and I was so pleasantly surprised. This would also work well as a dip - just use a food processor instead and leave out some of the oil and water so it's thicker. And for those meat-eaters - pour this sauce over your chicken, fish or steak, I bet it would be amazing. 

--Heather

Wednesday, April 18, 2012

Upcycled Hanging Planters

Earth Day is right around the corner and I had seen some adorable mini hanging planters that I wanted to test out. The ones I was inspired by were made of clay and looked like little boxes. Unfortunately, I could not make the clay do what I wanted it to so I gave up on that idea, but some little vintage dishes caught my eye when I was in the basement one day that I knew would work just perfectly instead.

Supplies:
Small containers - I used glass FireKing butter dishes
Hemp or twine
Washers
Ribbon
Plants


My mom has always been a collector of cute, retro cookware, so seeing these in the basement was no surprise. They all had glass lids and looked to be butter dishes (or at least that's what we've used them for in the past) and lucky for me, my mom has always been very generous and let me use these for the project.


So I was going for the macrame style hanging planter look, but I had the black hemp leftover from the chandelier project and decided that the more delicate threads would complement the smaller containers. To start, I knotted eight strands worth of the hemp onto a washer. 


Then I separated the eight strands into four pairs.


Here I just winged it on the length - in the end it was probably a little more than a foot worth of length from the top where I made my first four knots. 


Again, I had no clue how far down to do any knots, I just knew they should be even. So here you can see I have separated the original pairs and knotted new pairs down about two inches from the first knots. I swear it's not nearly as confusing as it sounds, and I don't think it makes a huge amount of difference on where the knots are.


Now here is the tricky part. You need to be able to hang the strings so you can place your container inside to figure out where you want the final knot. I used a clothes hanger and strung the washer onto the top and then hung the clothes hanger onto my nightstand. Another set of hands would do just fine as well. 


Here you can see that I just knotted all eight strands back together to create the basket to hold the container. These look almost precarious but I tested them out and it is much sturdier than it seems.


This is where you get to decide how you want to hang the little plants. I had initially thought I would just use some eyehooks and attach them to my ceiling, but I got a bit lazy and didn't feel like making sure they wouldn't give out. 


Luckily, my Nana was a big crafter in her day(that was actually her house you can see out the window) and left us with tons of adorable vintage ribbon like the one shown above, so I hung these right from the curtain rod already in place. You can see that I left the extra bit of hemp hanging down - I am curious to see how long it takes my cats to find this, so it may not last but I liked the way it looked. I've also seen the ends braided or beaded, which can make it look more polished. 


Overall, the only money I spent on this project was on plants, which could easily have been swapped out for seeds, or transplants from your own yard. I was just antsy and wanted to see these in their full glory! These would be great for a mini herb garden in the kitchen or a little greenery in the bathroom without giving up that precious counter space!  

--Heather

Sunday, April 15, 2012

Tea Cart Upcycle

When my Aunt texted me last week saying she was getting rid of her antique tea cart, I couldn't be more excited.  I had been waiting for an opportunity to try out a mosaic-like technique I saw on a coffee table a few months ago.  This turned out to be a great upcycle and an easy, FREE way to create a mosaic illusion under any glass surface.


Supplies:

Piece of furniture with glass
Paint Sample Cards
Spray Fixative
Exacto Knife
Spray Paint
Glue stick
Paper punch or scissors


This tea cart was pretty boring. All brass with 2 glass shelves.  I cleaned it off and sprayed it with Indoor/Outdoor Semi-Gloss white spray paint.


2 coats and it was good to go.


I went back inside and laid the glass shelves down on a white poster board I bought at Rite Aid for .99 cents. Then outlined the glass with a pencil.


I had this handy paper cutter that cuts perfect squares. Definitely made this project 100 times easier, I recommend picking one up in whatever shape you desire before doing this project.

The paint samples I picked up from Home Depot, they are free...so I filled up my purse. I'm pretty sure anyone watching thought I was crazy...but the end result of this project was so worth the 5 minutes of embarrassment in the paint aisle. 


Cut squares, cut squares, cut squares. 


This took the longest.


So with my hundreds of squares, I took a glue stick and glued them to my poster board within the outline that I had just traced.


Here is one of the mosaics right when I finished it. I was getting so excited at this point.


Molly played with the extra squares.


After I finished both mosaics for the top and bottom shelves, I laid my glass back down and used an exacto knife to perfectly cut the mosaic from the poster board.


I then sprayed some spray fixative lightly over the top of the mosaic, and laid the glass down on top.  This way, the poster board wouldn't buckle under the glass shelf.


How fun! And so EASY and so CHEAP (free!). How could you pass up trying this out for yourself??


No one would ever guess those squares are paint samples.


I have big plans for this tea cart, this is just a temporary spot. Think: top porch garden! I'll make sure to post pictures next week once we start fixing up our porch.

Now go steal some paint samples from Home Depot!

--Emily Jo


Thursday, April 12, 2012

Embellished Onesies

 This project was definitely one of those "fly by the seat of your pants" ones. Before I started all I knew was that I wanted to experiment with paint and patterns and that these onesies would be modeled by an adorable one year-old named Amelia.

Supplies:
Pack of onesies
Tape
Paint
Fabric
Embroidery Floss


I had bought that little spray bottle with the idea that I could do a spray paint style with regular acrylic paints that had been watered down, but I never got around to that so maybe next time!


Here you can see I started using the tape to mark off areas that I wanted to paint. 


Then I just dove right in! This type of tape did not result in the sharpest of edges, so if that's the look you are going for, I had read that contact paper works much better. The way I did it had a watercolor effect that I ended up really liking. 


I love polka dots (what girl doesn't?!) so I knew one of them had to be spotted and used a sponge that I cut into a circle to achieve that effect. 


Just dip in the paint and dab on the fabric. Again, not very crisp lines but that ended up working well with the others I made. 


Here are the four all together. Very cute as is, but I wanted to add a little something more. 


So I picked up a shirt on clearance at Kohls and got to cutting it up. 


I wanted to make heart patches to sew onto the onesies so I made a few heart patterns until I was happy with the results. 


Then I just traced them with a pen on the opposite side of the fabric and cut them out. I made sure to pick a material that I knew wouldn't end up in a frayed mess, so this jersey knit was perfect. 


Using embroidery floss in corresponding colors, I sewed a heart onto each of the onesies. 


All four ready to be wrapped up for the birthday girl!


Happy birthday Amelia! I've had so much fun watching you grow over the past year and cannot wait to see what the next year brings!

--Heather

Update:


Little Miss poses for a picture in her onesie! She's a natural!